Molecular Modelling using DeepView/SwissPdbViewer
Table of Content
- Installation of SwissPdbViewer
- Lesson 1. Basic Modelling Techniques
- Lesson 2. Energy minimization
- Lesson 3. Enzyme-ligand interaction
- Lesson 4. Structural Alignment
- Lesson 5. Homology Modelling
- Assignment
Installation of Swiss-PdbViewer
- Download the Software: http://spdbv.vital-it.ch/. Follow the instruction to download the Swiss-PdbViewer (the latest version for Windows should be version 4.0.1).
- After extracting the archive, the
executable of SwissPdbViewer should look like this:
- Double-click the icon, you will see the tool bar of Swiss-PdbViewer:

Lesson 1. Basic Modelling Techniques
1.1 Loading a PDB file- File > Open PDB File ... “tripeptide.pdb”
You will see the structure of an Ala-Ala-Ala tripeptide.
1.2 Basic Manipulation
- Rotate – Left Button
- Translate – Right Button
- Zoom – Left and Right Buttons
1.3 Control Panel (Wind > Control Panel)
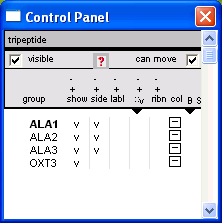
group - residue selection.
- Left-Click: Select one residue.
- Ctrl-Left-Click: select more than one residue
- Right-Click: Center the view on the selected residue
- Use Shift to select/deselect a range of residues
show / side / labl / ribn
- Left-Click: Toggle display of a selected residue / side-chain / label / ribbon.
- Right-Click: Toggle display for all residues
col
- Left-Click: change color of a select residue
- Right-Click: change color for all residues
1.4 Some useful buttons on the menu bar
 - obtain
information and label the selected atom. You can remove the label by Display > Labels > Clear User Labels.
- obtain
information and label the selected atom. You can remove the label by Display > Labels > Clear User Labels. - measure distances between two atoms
 - perform in silico mutagenesis
 - change the torsion angles of a selected residue
 - return to
the manipulation mode (or Press 'esc')
- return to
the manipulation mode (or Press 'esc') - 'Reset View' by include all atoms in the current window
Exercise 1
1. What is the distance between CB atom of Ala-1 and CA atom of Ala-3?2. Mutate Ala2 to Phe.
1.5 Try to load another PDB file
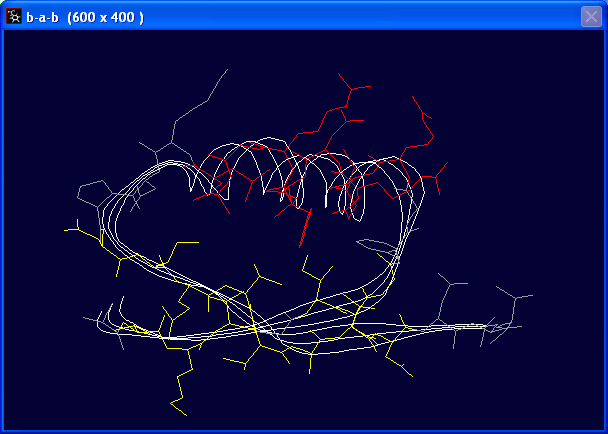
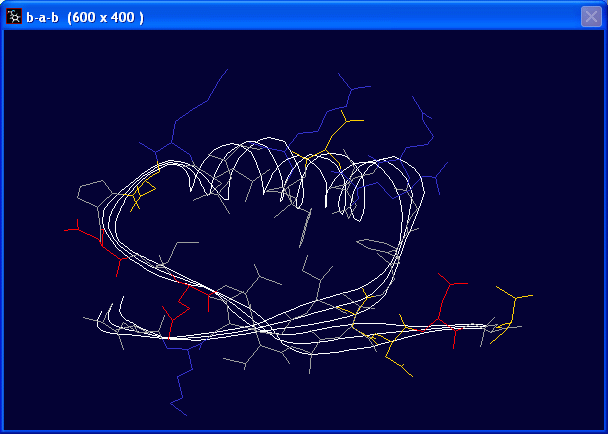
- File > Open PDB File ... “b-a-b.pdb” - This is a PDB file for a beta-alpha-beta motif of protein.
- Press the 'reset view' button ,
and you should be able to see two structures. Although they appear on
the same display window, they are located at different 'Layers' in
SwissPdbViewer. In an analogy to Layers in Photoshop, you can select
and manipulate different layers separately in SwissPdbViewer.
- You should notice that only heavy atoms are included in this PDB file. It is because most structures determined by X-ray crystallography do not see hydrogen atoms.
1.6 Layer Infos (Wind > Layers Info)

- You can select the active layer using 'Layers Info'.
- Now select 'tripeptide' as the active layer, and close it by File > Close
1.7 Secondary structure
By default, the program will detect secondary structure when a PDB file is loaded. If not, you can detect secondary structure by:
- Tools > Detect Secondary Structure
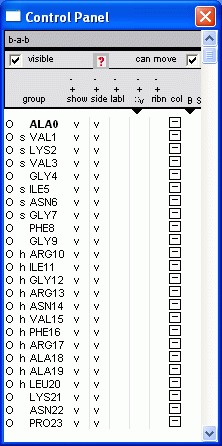
In the Control Panel, the letter 's' represents beta-strand, while 'h' represents helix.
- Try Right-Click at the 'ribn' column. You should be able to see the ribbon representation of the protein structure.
1.8 Hydrogen bond pattern
- Tools > Compute H-bonds
1.9 Color By default, the atoms are colored according to their atom type (i.e. Color > by CPK)
White - carbon, Red - oxygen, Blue - nitrogen, Yellow - sulfur, Orange - phosphorus
You can use different coloring scheme to obtain various properties of the residues:
- Color > Secondary Structure
- Color > Type
- Can you notice where are the non-polar residues located?
Exercise 2
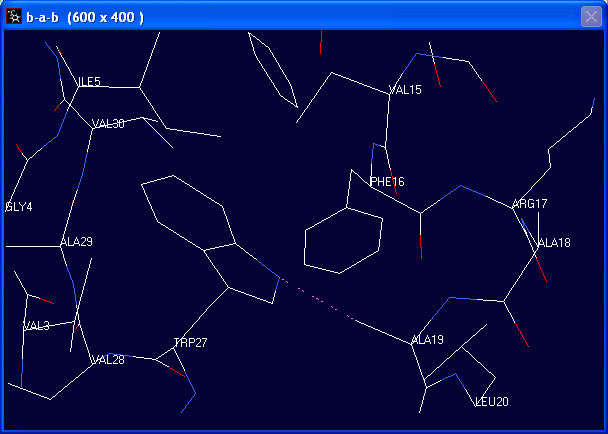
1. Mutate the Val27 to Trp. (Tips: use Control Panel to identify the location of Val27)2. After the mutation, you should be able to see a pink dotted line. Measure the distance of this dotted line.
3. Given the van der Waals radius of C, N, O, H are 1.7, 1.55, 1.52, 1.2 Å, respectively, what is the meaning of this dotted line?
Lesson 2. Energy minimisation
2.1 Finding potential problems in protein
After substituting Val-27 with Trp, the aromatic ring of Trp-27 is in steric clashes with the methyl group of Ala-19 (indicated by the pink dotted lines).
Such steric hindrance may be relieved by performing energy minimisation.
2.2 Setting minimisation preferences
- Prefs > Energy Minimisation ...
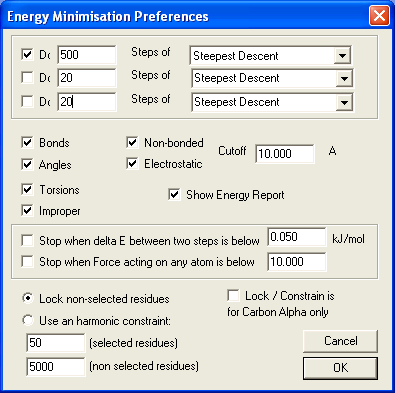
- to perform 500 steps of energy minimisation using the Steepest Descent method.
- all energy terms are included (Bonds, Angles, Torsions, Improper, Non-bonded, Electrostatic)
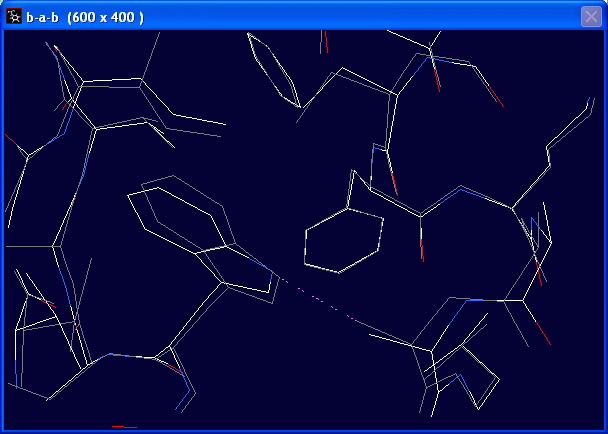
2.3 Running minimisation
- Select all residues in the Control Panel.
- Tools > Energy Minimization ...
After energy minimisation, the program has automatically added hydrogen to your structures.
You can toggle the display of hydrogen by Display > Show Hydrogens
Did you notice any structural change after the energy minimisation?
Exercise 3
Mutate Gly12 to Val and perform energy minimisation to relieve the steric clashes introduced by the mutation.
Lesson 3. Enzyme-ligand interaction
3.1 Loading PDB file of SARS main protease
- File > Open PDB File ... “protease.pdb”
- SARS main protease is a dimeric enzyme containing two chain. Try "Color > Chain" and look at the dimeric structure of the enzyme.
3.2 Slab mode
For a protein, it is quite confusing to look at all the atoms at one time. Sometimes it is better to reduce the depth of view by turn on the Slab mode.
- 'Display > Slab' to turn on/off the slab mode. When it is on, the depth of field is limited to ~10Å. You can set the Slab depth by 'Prefs > Display ...')
Exercise 4
SARS main protease is a cysteine protease and the active site consists of a catalytic dyad of a cysteine and a histidine residue. The histidine residue involved is His41. Use Slab mode and zoom in the region around His41 and find out which cysteine residue is involved in the catalytic dyad. The distance between the SG atom of cysteine and the aromatic ring of His41 should be less than 4Å.
3.3 Loading PDB file of protease inhibitor
- File > Open PDB File ... “inhibitor.pdb” (Reference: Yang et al. (2005) Plos. Biol. 3:324)
So we have to merge the two layers first.
3.4 Merging two layers
- Select all atoms from both layers (Select > All)
- Edit > Create Merged Layer from Selection (by layer)
3.5 Remodelling side-chain conformation
- Select '_merge_' as the active layer
- 'Color > Protein Problems' - it should show steric clashes (pink dotted lines) from Met49, Met165 and Qln189.
- Select Met49
- 'Tools > Fix Selected Sidechains > Quick and Dirty' will optimise the side-chain conformation of Met49 and relieve the steric clashes between Met49 and the inhibitor, without affecting the conformation of other atoms. This algorithm is much quicker than energy minimization and is recommended for modelling many side-chains.
Exercise 5
Using the 'Fix Selected Sidechains', fix the steric clashes among Met165, Qln189 and the inhibitor.
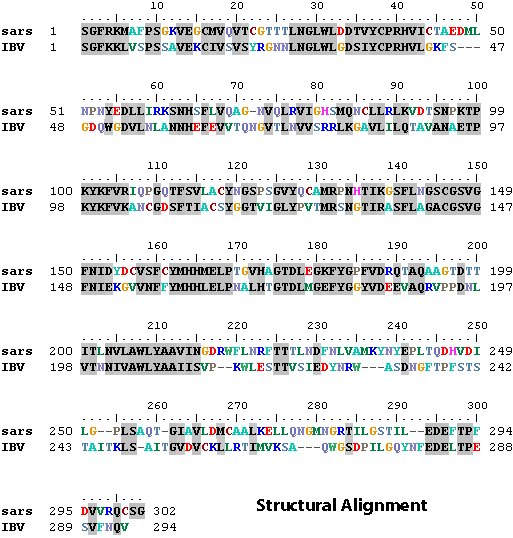
Lesson 4. Structural Alignment
Structural alignment use 3D structure information to obtain a pairwise alignment between two proteins.
For simplicity, we will use the structure of chain A of SARS CoV and IBV (Infectious Bronchitis Virus) main proteases to construct the structural alignment.
4.1 Loading PDB file of SARS and IBV main protease
- File > Open PDB File ... “sars.pdb”
- File > Open PDB File ... “IBV.pdb”
- Color > Layer
- Click the reset-view button
You should now be able to see to protein loaded. Yellow - SARS main protease, Blue - IBV main protease.
4.2 Structural Alignment
- Wind > Alignment - to open the sequence alignment window. You should see the sequences of SARS and IBV main proteases.
- Fit > Magic Fit - You should see the structure of IBV protease will fit 'magically' to the structure SARS protease.
- Fit > Generate Structural Alignment - this will create a structural alignment. Two residues are aligned together if they are nearby in space.
- Select 'IBV' as the active layer, and 'Fit > Improved Fit ...' - this will fit the SARS and IBV proteases based on the alignment. You
should notice the alignment window will be updated, and the aligned
residues are shaded in gray:

- In favorable cases, step 1-4 can be automated by a single command 'Fit > Iterative Magic Fit'.
- You can save the alignment in simple text: by 'File > Save > Alignment ...'.
Exercise 6
The main protease has two domains: the N-terminal (residue 1 to ~195) and the C-terminal domain. Which domain of the proteases has a better alignment (or more conserved 3D structure) ?
Lesson 5. Homology Modelling
In this lesson, you are going to use homology modelling to predict the 3D structure of murine hepatitis virus main protease.
5.1 Register with SwissMODEL server- In this tutorial, we are going to use the SWISS-MODEL server for homology modelling. You need to register with the server at http://swissmodel.expasy.org/workspace/index.php?func=account_create1. You are strongly advised to create your own account (for your assignment). If you don't, we have created an account for this tutorial, please ask the instructor for the login name and password.
- Type in your login name 'Prefs > SwissModel ...'
5.2 Loading the raw sequences of the protein you want to predict its structure
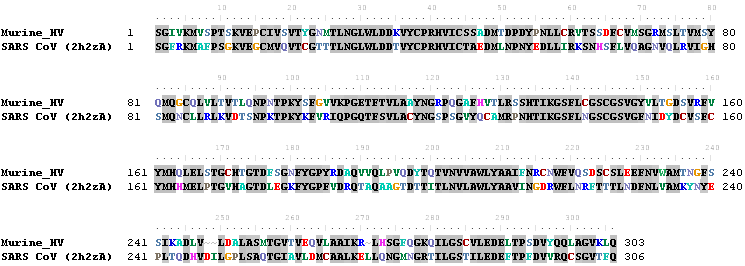
- Prepare the primary sequence of murine HV protease in FASTA format: murine_hv.fas
>Murine_HV
SGIVKMVSPTSKVEPCIVSVTYGNMTLNGLWLDDKVYCPRHVICSSADMTDPDYPNLLCR
VTSSDFCVMSGRMSLTVMSYQMQGCQLVLTVTLQNPNTPKYSFGVVKPGETFTVLAAYNG
RPQGAFHVTLRSSHTIKGSFLCGSCGSVGYVLTGDSVRFVYMHQLELSTGCHTGTDFSGN
FYGPYRDAQVVQLPVQDYTQTVNVVAWLYAAIFNRCNWFVQSDSCSLEEFNVWAMTNGFS
SIKADLVLDALASMTGVTVEQVLAAIKRLHSGFQGKQILGSCVLEDELTPSDVYQQLAGV
KLQ
- Load the primary sequence of murine_hv.fas by 'SwissModel > Load Raw Sequence from Amino Acids ...' - You will see an extended polypeptide chain in the main window, and the loaded sequence in the Alignment window.
- A BLAST search will tell you that Murine_HV has a 50% sequence identity with SARS main protease, which 3D structure is known. You can use the known structure of SARS main protease to predict the structure of Murine_HV main protease by homology modelling. A rule of thumb is: the structure predicted by homology modelling is likely to be correct if the sequence identity is >30%.
- Load the known structure File > Open PDB File ... "2h2zA.pdb" - this will load the template structure.
Now you should be able to see both proteins in the main window.
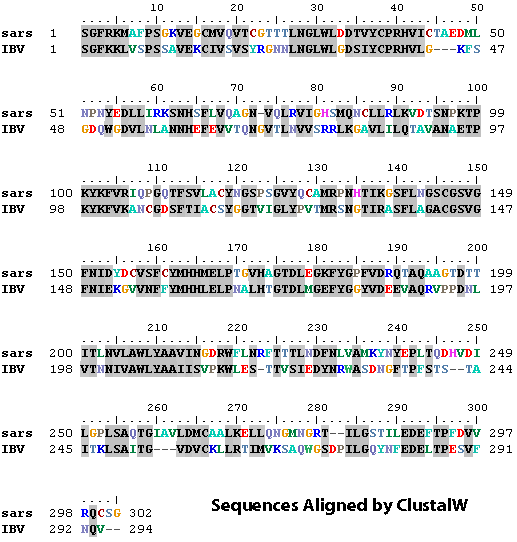
5.3 Sequence Alignment using ClustalW
Sequence Alignment is the most important step in homology modelling.
Incorrect alignment will lead to wrong 3D model. Alignment between two
sequences can be obtained by pairwise alignment method (e.g. BLAST).
However, in most cases alignment can be improved using the technique of
multiple sequence alignemnt. The most popular program to align multiple sequences is ClustalW.
The main protease is found in the genome of all coronavrius. The file 3cpro_all.fas contain the protein sequences of main protease of related
coronaviruses. You can obtain use the web interface of ClustalW to
obtain the following sequence alignment (http://www.ebi.ac.uk/Tools/clustalw2/index.html). For simplicity, only the sequences of murine HV and SARS CoV main proteases are shown:
5.4 Adjusting the alignment manually in Swiss-PdbViewer
- Adjust the alignment so that it matches with the alignment obtained using ClustalW.
| insert a gap | ctrl-space bar |
| delete a gap | ctrl-backspace |
| move the selected residues to the left/right | ctrl-left/right arrows |
- For example, there should be an insertion of two residues between V-247 and L-248:

- To insert the gap, select L-248 and press ctrl-space bar twice

- For more alignment editing commands, see Help > Align Window
Exercise 7
There should be another insertion between R-268 and L-269. Please insert the gap yourselves.
- SwissPdbViewer can read and write alignment in FoldFit format. The alignment file foldfit.txt is included in case you get lost with the alignment. You can load the correct alignment by 'SwissModel > Load FoldFit Alignment ...'
5.5 Model Building
- Click the 'mdl' coloum on the right hand side of the 2h2zA template in the Layers Info window:

- Select the Murine_HV layer, and submit the job to the SWISS-MODEL server. 'SwissModel > Submit Modeling Request For Current Layer ...'
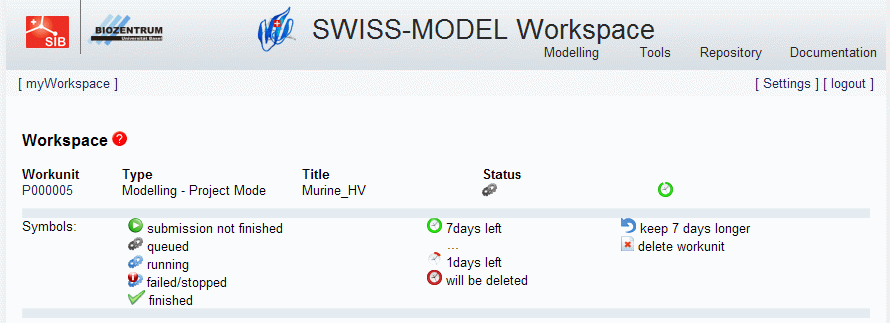
- You can now check the progress of your project at the SWISS-MODEL homepage: http://swissmodel.expasy.org/workspace/index.php?func=show_workspace:
- Login and you should see something like this:
- The modelling will take some time. After it has finished, you should see:
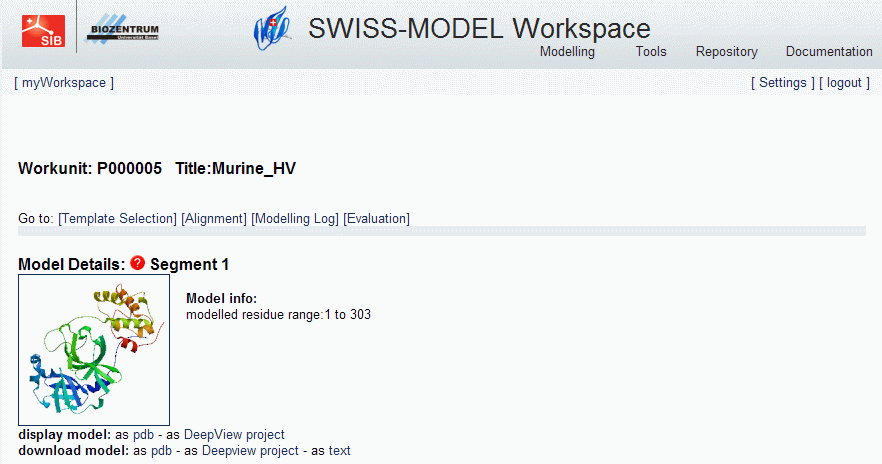
- You can download the model as Deepview project, and analyze it using Swiss-PdbViewer.
- I have run the modelling before, and you can download the result here.
Assignment
Predict the structure of main protease of bovine CoV using SWISS-MODEL. The primary sequence of the protein is:>Bovine_CoV
SGIVKMVNPTSKVEPCIVSVTYGNMTLNGLWLDDKVYCPRHVICSASDMTNPDYTNLLCR
VTSSDFTVLFDRLSLTVMSYQMQGCMLVLTVTLQNSRTPKYTFGVVKPGETFTVLAAYNG
KPQGAFHVTMRSSYTIKGSFLCGSCGSVGYVLMGDCVKFVYMHQLELSTGCHTGTDFNGD
FYGPYKDAQVVQLPVQDYIQSVNFVAWLYAAILNNCNWFVQSDKCSVEDFNVWALSNGFS
QVKSDLVIDALASMTGVSLETLLAAIKRLKNGFQGRQIMGSCSFEDELTPSDVYQQLAGI
KLQ
Please submit the resulting PDB (in DeepView project format) to CUForum.